Installing a blogger template on your blogger blog is very easy. balrajtemplates.blogspot.com gives you thousands of free blogger templates for renovating your blog. Yes! We giving new look for a blogger blog. This tutorial shows you how to install/upload a new blogger template. We cover two types of installing method with step by step guidance.
Method-1: Uploading .xml file. Your existing widgets will keep on blogger and you need to remove manually on this method
Method-2: Copy and Paste coding. Completely replaced all coding. (If you have an error when uploading template using method-1, then try method-2)
First, we going to method-1 which is uploading .xml file.
Step 1: Downloading Blogger Template.
Browse blogger templates in our most popular categories like Responsive, SEO Ready, Magazine, Simple, Clean, Portfolio and Fashion. (You can Live Preview our every template to know how your blog look like after uploading the template.) After the browsing, click Download button on your desired template and the template file will directly downloaded and stored in your computer hard drive.
Step 2: Extracting zipped downloaded template file.
File format that you have downloaded is a .ZIP file format. We are only able to upload a file with .xml extension. So it is need to be extracted. Please Extract / Unzip it.
Step 3: Logged in your Blogger Dashboard.
You must logged in your google account to access your blogger dashboard (Ignore this step if you are already logged in)
Step 4: Access Theme Section.
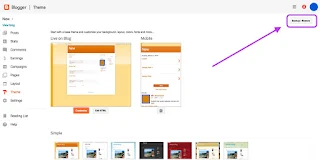
Choose (If you have multiple blogs) your Blog in your Dashboard that you want to change template, and click “Theme” in the option panel on the left.
Step 5: Access Backup / Restore.
Look at the top right corner, you will see “Backup / Restore” button and click it on.
| Before going the next step, Please backup your previous template because, if you have any problem after uploading the new template, the backup file will help you to restore. Please Read the post about Backup and Restore in Blogger. |
|---|
Step 6: Get ready to upload.
Manage on pop-up windows and click “choose file” button and look for folder that is created after extracted file that you have downloaded.
Step 7: select .xml file for uploading.
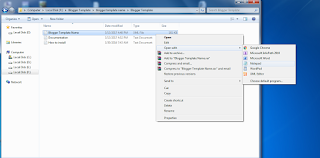
Folder has a .XML file, .TXT file, Internet shortcuts and etc., You should select only .XML file.
Step 8: Start uploading template.
Click “Upload” button. Now uploading process appear in your screen.
Now the template will appear in your blog successfully.
Another method which is installing blogger template using copy and paste
We were unable to save your theme. Your theme could not be parsed as it is not well-formed. Please make sure all XML elements are closed properly. XML error message: Content is not allowed in prolog.
If you see the above error when uploading your template, then try this copy, paste method.
Continue above steps still step-5
Step 6: Open .xml file with text editor.
Open .xml file using text editor like notepad, wordpad, notpad++ or something like that.
Step 7: Copy all coding.
In the text editor, press ctrl+a and then ctrl+c (ctrl+a to select all coding, ctrl+c to copy the selected coding)
Step 8: Open HTML Editor on blogger.
Now open HTML Editor on blogger dashboard and click “Edit HTML” button.
Step 9: Paste coding on blogger HTML Editor.
Click anywhere inHTML Editor. Now press ctrl+a and then ctrl+v (ctrl+a to select all coding, ctrl+v to replace selected coding with copied template coding). Finally click “Save theme” button.
YES! THIS TEMPLATE INSTALLED SUCCESSFULLY!


